Back in April I was eating a very tasty orange, and thinking about the land that we have, and all the trees that we can plant, when I thought “I´m going to check out how to grow trees from the seeds!!” Some readers are probably thinking “you just plant them! Duh!” But I found out online that some seeds are very picky, and won´t grow unless they are in the right conditions. Also, because it is so hot here in Nicaragua, a lot of trees have to start off growing inside, so that they don´t get burned in the sunlight.
Anyway, I checked out how to grow an orange tree from a seed on ehow.com, and it came up with a few ways of doing it. The coolest one was what they described as a great activity to do with your kids, and I agree! I love little science experiments, and this is pretty awesome, and you get an orange tree!
(Note: I also read that this can be done in the cold north as well, you would have to keep the tree indoors most of the year and it will probably never produce fruit, but orange trees are very beautiful, and smell nice too!)
You will need:
- Orange(s)
- Plastic sandwich bags, one for every seed you want to plant (NOT ziplock! You don´t want the bags to seal)
- Paper towel, one sheet for every seed you want to plant
- Water
- Eventually you´ll want pots to plant the trees in. We are using old yogurt, icecream or instant noodle lunch containers, or even pop bottle cut in half. Just remember to punch holes in the bottom!
- (this step wasn´t on ehow.com, but it is important) after eating an orange save the seeds. Put all the seeds in a bowl room temperature water and clean off any left over orange juice (rub the seeds between your fingers) The seeds that float can be discarded, they will not germinate.
- Collect all the “sinkers” and leave them to dry completely for a day or two. (NOTE: this isn´t actually that important. We had success with seeds that we let dry, and those that we planted right away. I think the point is that if you are going to store the seeds for planting at a later date, you should make sure they are completely dry before you pack them away so as to prevent mold growth)
- Take a single sheet of paper towel, and for it in half three times (so that you have a rectangle of paper towel that is 8 sheets thick.
- Drip water onto the folded paper towel until it is completely damp. Do not soak it! If there is too much water the seeds wont grow. If there is too much water, ring the paper towel out. What you want to do is make a humid environment for the seed to germinate in.

- Place a single orange seed between the folds of the paper towel, and put the paper towel into a sandwich bag.
- Store the bags in a hot place (ehow suggests on top of the refrigerator) Check every few days to make sure the paper towel is still damp. If it is dry, drip some extra water into the bag. If you hold the paper towel in front of a light, you should be able to see growth, if there is any. Growth should begin in about 10 days.
- Once the tree starts to grow it can be planted in a small pot. Be careful not to over water while they are still small. Once there are leaves, the trees should be place in the sun for a few hours a day (If you´re doing this in Canada, keep the tree inside unless its summertime, if its winter the trees can be places near a window, but the temperature needs to stay hot!)
- As the trees grow they can be planted in bigger pots. Various sites suggest adding fertilizer and changing the soil if it is going to be an indoor tree.
Orange trees seem to be pretty temperamental. They grow very slowly, and need humid weather to grow best. Nicaraguan rainy season is the best time, or Canadian summer I guess!
Important note: Online it says that if you take your seeds from a really tasty orange, it does NOT mean that you will have a tree that produces tasty oranges (unfortunately). Mangos however, as I read online, are a clone fruit. So if you eat a really tasty mango and plant that seed, you will grow a tree that produces very tasty mangos!!
Although I don´t like mangos that much, my husband LOVES them, and I would never deny him the joy of having mangos in his own yard. So in the midst of my orange seed research, I also checked out mangos!
Mangos are interesting because some mango seeds can grow multiple trees-as many as 12 in some cases- once they start growing you can carefully separate the seed and plant them separately. There are tons of different types of mangos.
One thing that I do not like about mangos is the stringy texture. When you eat a mango it gets stuck in your teeth. But here in Nicaragua there are some types of mangos that aren´t stringy. Mango Rosa, (they are a pink colour rather then yellow) are sweeter, and not stringy.
Also, mangos are NOT temperamental. They will pretty much grow in anything, as long as the temperate is right. They can also take a beating. You can cut and trim as much as you want. I read online that you can completely cut down a mango tree, and as long as the roots and stump are in the ground, a new tree will start growing!
Mango tree instructions
- Eat and enjoy your mango!
- Cut off as much of the stringyness as possibly (one website actually suggests scrubbing the seed with a brush), and allow the seed to dry for a few days (make sure both sides are dry.) You can store the seeds once they are dry if you are going to wait, but make sure they are completely dry because they will grow mold if they are still wet!!
- When you are ready to plant your mango you will need to cut open the shell, and remove the seed from inside. Be very careful! If you cut the seed that is inside, or loose part of it, it might not grow (that happened to us a few times).
- Once you have removed the seed from the shell, plant it! Check the soil daily, and keep it moist. The tree should start growing in a couple of days
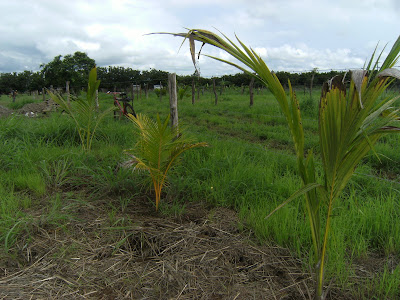
Mango trees grow fast! It took over a month for our orange trees to grow to about 4cm, but in just one week one of our mango trees started to grow, and is now a foot tall! Once the tree has leaves, it can basically go out in the sun/rain, whatever weather (minus the cold). If it happens to be a very dry summer, you should water the tree whenever the soil looks really dry.

Both mango trees and orange trees will take 5 to 10 years before they start producing fruit. Most trees that you can buy in nurseries are grafted, which is why they produce fruit faster. I know it´ll take a long time, but it´ll be pretty rewarding when we eat our fruit for the first time!
We also have plans to plant an avocado tree from the seed (which is also a great kid experiment – you can grow them like potatoes in a glass of water) a few pineapples (they are beautiful!!), and maybe even a papaya tree. I will post more when we start planting!
Happy planting! I don´t know if anyone in Canada will actually plant a mango tree, but I really think the orange tree experiment is a good idea for any parents out there!
 My arched windows are finally finished!
 The floor was poured last week!
 Inside: arched windows and solid floor!
 My bathroom is still dirt floor.... hopefully that will get finished soon!
 Front: We actually have finish doorways and windows!!
 This side (which will become part of the front of our house in phase two) isn´t finished yet because those windows are arched. I know, fancy!! But fanciness means more time!!
 Interior. There sides are completely done, and the last side, (arched windows) will be finished early next week. The roof will go up next week, and then they will pour the floor.
 My future livingroom/kitchen/diningroom!
 My future bedroom (and bathroom in the corner)
 It looks a bit prision-like right now, but after they finish the walls it will be covered in a concrete stucco, so you wont actually see the blocks anymore.
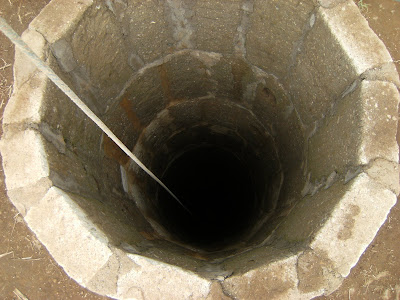
 Our Finished Well!


 David decided to take a look, so they harnessed him up (and by harnessed him up I mean they tied the rope around his waist and legs) and he climbed down.
 I was pretty nervous as he went down, but he made it...
 Checking out the water at the bottom! At the moment it´s dirty because they are still digging, but after another meter and a half it should be nice and clean!

 Note: that what we are building right now is phase one of three of our final house plans (it´s all we can afford right now!). Phase one is our “casita” (little house) which is just 5m x 10m, including the bathroom. Phase two involves adding the rest of the first floor, which will be another two times what we have now, making the house 15m x 10m. It will have a nice big open kitchen and living room, and eventually a porch. We are hoping to build this addition in the next 2 years. And phase three, which is a distant dream that may never happen (but we can hope!) is a second floor!
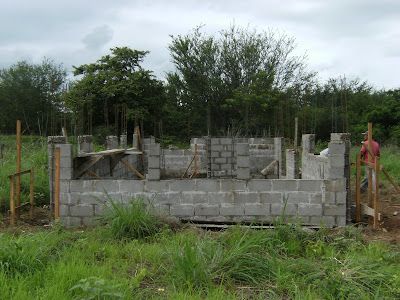
 The view from the top: you can´t even see the bottom anymore!! Its more then 10m deep, and the guy has been chipping out hand and foot holds from the side of the well to climb in and out.